Showing posts with label drag. Show all posts

Tuesday, 1 December 2015

Aligning Weird Angle Fittings

Sometimes, if you work out Tube and Pipe long enough you will have this problem where fittings are shown at weird angles misaligned with the run. Even if you haven’t encountered this you will at some point so do yourself a favour and read ahead on how to solve it. It is very rare when this happens and starting over your T&P layout again is always an option but you don’t have to because there’s a quick fix.

Aligned fittings

You haven’t done anything different than the usual, but when you place a fitting it comes up at a weird angle and if you try the Change Fitting Orientation command, Inventor will report “0.00” angle and so you don’t know by how much to rotate it to get it to line up with the rest of the run again.

Angles do puzzle me some times but this should be straightforward.

TIP:  The reported angle depends on the type of elbows specified in the route style, how much you drag the rotation arrows or your manually entered angle value. Nonetheless if you get a weird angle and don’t know how to align it then keep reading for a solution.

At this point you might be thinking to use the Change Fitting Orientation command and right away activate Rotation Snap on the right click menu. You will then think of dragging the arrows until they snap to adjacent geometry. Good luck with that! The randomness of getting that command to work has drove me crazy too many times.

You can also measure the angle with All Digits precision active but an almost right value is never the right value.

When I get this problem I unground the component, constrain it, ground it back and then I delete the constraints. Kind of crazy but read ahead why.

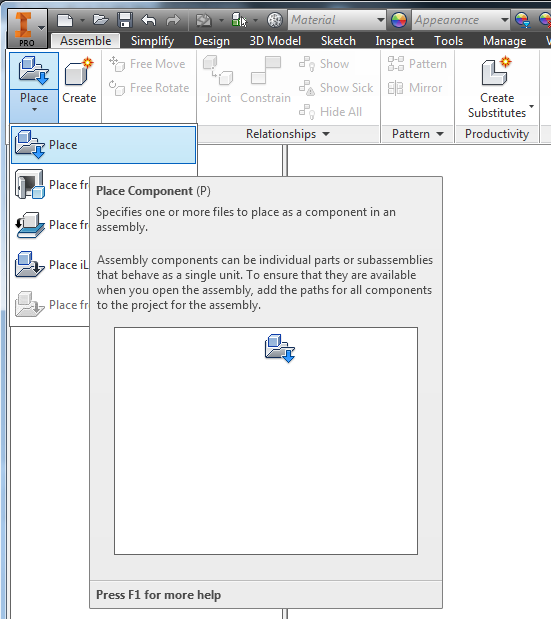
 Once you enter Tube and Pipe environment you will get customized menus, layouts and browsers so you the usual commands are not always there and for a reason I might add. While these commands are working you might brake T&P functionality and end up with unadaptive routes or even worse, crashes or corrupted files; none are fun to deal with so keep to the manual or standard procedures as much possible.

One of the missing commands is Grounded status on the right click menu, graphical window or browser. There is a reason for that, and we shouldn’t mess about with it but sometimes we have to and as long as you remember to tick it back on then we are ok.

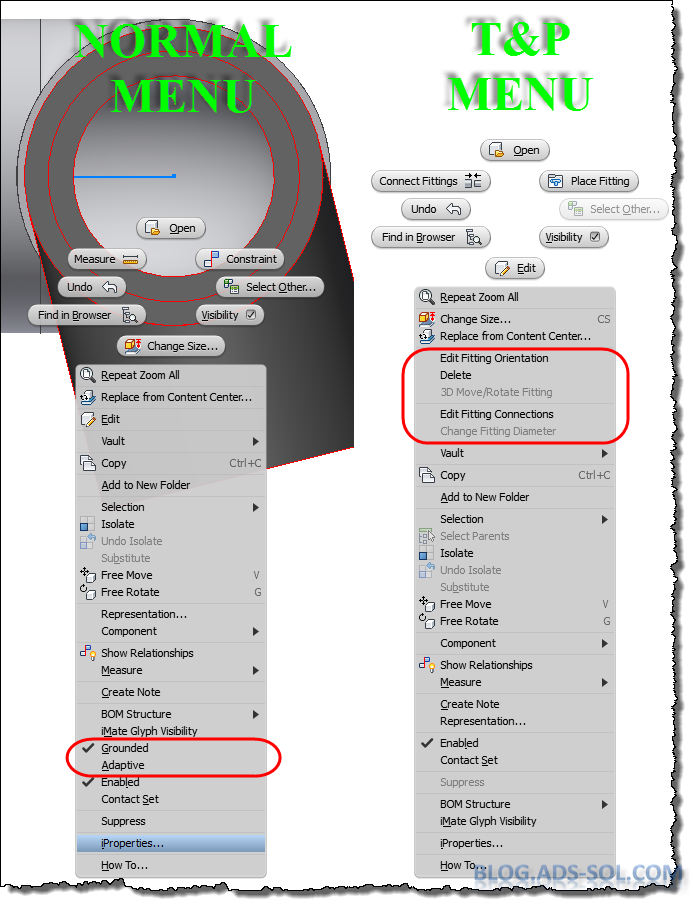
T&P has custom menus, UI layouts and browsers.

Right click the part in the browser or graphical window, choose Occurrence tab and tick off Grounded then click OK.

Ground option is only available on iproperties.
Now you can constraint you fitting however you want it. I usually use the origin planes of the fitting and of the pipe or element right next to it.

Constrain the fitting to fix the orientation

Use the part iproperties to put the Grounded option back on and then click OK. Unfortunately there is no shortcut option to ground components but this is not that time consuming.

Delete the constraints you just created but notice that the part stays put because of the ground status.

And that’s how to align a weird angle fitting.

Later,
ADS.


Tuesday, 3 November 2015

Restructure


Organizing and restructuring is daily job and you need proper tools for that. When I need to move components around there is no better tool than promote and demote.

Restructuring can be tedious and time consuming.
While these commands have nothing new in themselves and you probably use them all the time I would like to share some tricks and tips with promote / demote. The Demote/Promote helps restructure the assembly and you can use the shortkeys Shift+Tab (Promote) and Tab (Demote) or choose them in the right-click menu Component submenu.

Promote/Demote
                As I’ve mentioned before promote/demote is useful in T&P when you have fittings that can’t be deleted and you’re stuck with parts that don’t belong there anymore. You can try and use the DELETE key on your keyboard because sometimes that works, even though there’s no Delete on the right-click contextual menu when you select those fittings.
                At this point you either drag those fittings (multi-select works as well) to a higher level outside T&P where they can be deleted or you demote them to a subassembly that can be deleted afterwards.
                A different trick and different approach that I like to use when doing quick layouts for sale quotes would be to promote existing designs. Consider the following scenario:
I have a plant layout that looks similar to what the new client wants but he has supplied drawing for the plant room so I can’t just save the existing project with a new name. I create the room using the drawing provided by the client and then I place the existing layout that I don’t want/need to change using just a regular place command.
I then select all the components inside the existing project and I promote them to a higher level. The good thing about this technique is that the components will maintain position and even better they will maintain any constraints in between them. This saves time when under pressure and it helps me get quotes out in minutes; these are potential jobs anyway so why waste time on things that might not turn out to be of value.
As soon as you’ve promoted the components you can then delete the original assembly BUT in the dialog window choose not to save it otherwise the assembly will lose its components (promoted).
A different case would be when you have a subassembly more than once in the model and you need to promote its components. As soon as you promote one set of children they will disappear from the other subassembly. There are several ways of promoting the rest of the children up:
1 - If you use Vault or the subassembly is a library or read-only file then this will not work so get to the next point to see a solution. In all the other cases you can open the subassembly in a new inventor session and all you need to do is hit the Save button then head back to the first Inventor session and in the Inventor menu (big I top left) choose Manage and then click on Refresh. Inventor will complain that the subassembly has been updated outside the current session and prompt you if you want to save the current changes at which point you say NO. You can no promote another set of children and use Save on the outside session then Refresh it the current session.
Here’s a small animation.

use Refresh to update changes done outside the current session.
2 - If the subassembly is vaulted, or library read-only then the solution is much easier but takes longer to do. Because we can’t save the file in an outside Inventor session we can’t use the refresh command. The command will work but will not see any updates on the file. As soon as you’ve promoted the first set of children you can then close the assembly but in the save dialog choose NO on the subassembly which should be read-only anyway. As a side note when you use promote Inventor might ask you to check-out the subassembly from vault so you can choose NO in there as well. Now open the assembly again and you will see the subassembly in its original form and you can no promote another set of children.
TIP: If it’s a large assembly you are dealing with, opening and closing it all the time might not be efficient but you can save a copy of the subassembly in a read-write location and use the solution presented at point 1.
Here’s a video of the second solution. I am having a really small assembly but on large files this will not be an efficient solution.

close without saving will reload complete asm.
It is not complicated and I urge you to give it a try. Imagine how much time you will be saving in fixing constraints and dragging components to a similar position. 

Organizing can be easy with proper tools.

Later,
ADS


photo credit: <a href="http://www.flickr.com/photos/12897738@N00/144315128">Metrics</a> via <a href="http://photopin.com">photopin</a> <a href="https://creativecommons.org/licenses/by-nc-sa/2.0/">(license)</a>

photo credit: <a href="http://www.flickr.com/photos/99357189@N00/98009491">wrenched</a> via <a href="http://photopin.com">photopin</a> <a href="https://creativecommons.org/licenses/by-nc-sa/2.0/">(license)</a>

Tuesday, 13 October 2015

Place Multiple Fittings

I use a lot of Georg Fischer fittings to do my plant layouts but not all have been properly dimensioned in the catalogue and because it would take too long to identify and create an ipart / content center family, I usually author and place them as individual fittings.

piping as an art?
I know that I lose the possibility to Change Size but it’s not taking long to change them with place fitting command. If I need to change size of a component I can right click, choose iproperties, copy the file path, use the place fitting command and paste the file path, double click on new size, and all this takes less than 5 seconds, almost as much as it would take to wait for the change size menu and the family table to show up.

Because the original files are provided in a neutral file format like STEP I need to open each and every, author it and save it to library and I found that it’s faster to do it from an assembly. I drag-drop the step files inside an empty assembly, then edit each in place, author it and then save the  files. I can also check them into Vault real quick this way.

Another reason for doing this in the assembly environment is to be able to set part number and description for all of them at once by copy paste from an excel file to the BOM window. You can of course change any other iProperties custom or not.

The other day I had to change description to all my ABS Socket Welded Check Valves so I started a new assembly and then used the place component command. In the select component window I have browsed to the library folder and selected all the valves but when you click OK Inventor will place just the first selected component because it’s an authored Tube and Pipe Fitting. Lazy as I am I didn’t’ wanted to kill my finger or the mouse so instead I have dragged them from windows explorer inside the assembly.


When you use the place command inside an assembly, if you have enabled the T&P add-in you will see that the parts come in as fittings (blue elbow icon on the browser). But if you drag-drop them from windows explorer they are placed as standard components. This will not affect them in any way and it's just a visual indication only.

So next time you need to edit a lot of fittings, or need to add a set to use in the assembly, remember to drag-drop them from windows explorer. Now you can edit them all at once form BOM editor or use the Place Fitting command on them rather than browse and select every time.


Later,
ADS

Friday, 9 January 2015

Vault Project

                Vault has not been part of my CAD up until 18 months ago and everywhere I’ve been a project file for each job has been in place. Now we only use on project for entire CAD area and while I like that I don’t need to play with changing and managing projects I do miss a couple of things. It seems all I do is browser for files and it takes longer now to do nested projects so that I can create local editable CC items. I know there is global setting for placing CC as custom but I am taking about that special times when we need to generate all the tube and pipe elements locally which otherwise would go straight to default CC folder without a local generation option.

                Having one vault project will not take you to your work in progress (just latest used location), like if you had a project for each job. I can’t edit the vaulted ipj file without affecting the rest of my colleagues so the only reasonable thing to do was to create shortcuts for the most common and current projects I work on. Nothing fancy here, just good old windows shortcuts to save me from navigating folders all day.

                So when I open or place something I click on Workspace (if I am not already there) in the left side window and then on to my shortcuts for a speedy navigation.


The fastest way for creating shortcuts is to drag with your left mouse button while holding ALT pressed the destination folder into your Workspace.


                I would only recommend you to be careful when deleting shortcuts, make sure it’s just them you’re deleting.


Later,
ADS.