This will continue exploring our drawing symbols and notes in Autodesk Inventor. Last post we discussed how to hide the leader but maintain attachment link and position.
If you use AutoCAD a lot you might wonder if there is a way to create text masks in Inventor. Sadly there isn’t but there are other ways to hide objects behind your symbol or note.

Out of the box but turned off we have the Cross Hatch Clipping option that will trim the hatches with a box around your texts, like on dimensions, notes, or symbols.
To turn this on, which I do because it looks better and makes the text legible, you need to open Document Settings on the Tools tab, Options panel of the drawing. In the document settings window head over to the Drawing tab and tick the box on Cross Hatch Clipping.

Once that is on and you have text overlapping hatched areas you should see the hatch being trimmed by a rectangular box around your text.
On the left Cross Hatch Clipping is off and on the right is on. It does look better doesn’t it?

TIP: You need to create them a symbols and not by activating sketch or draft view because you can attach it with a hidden leader and they can more easily be copied around on other sheets or drawings.
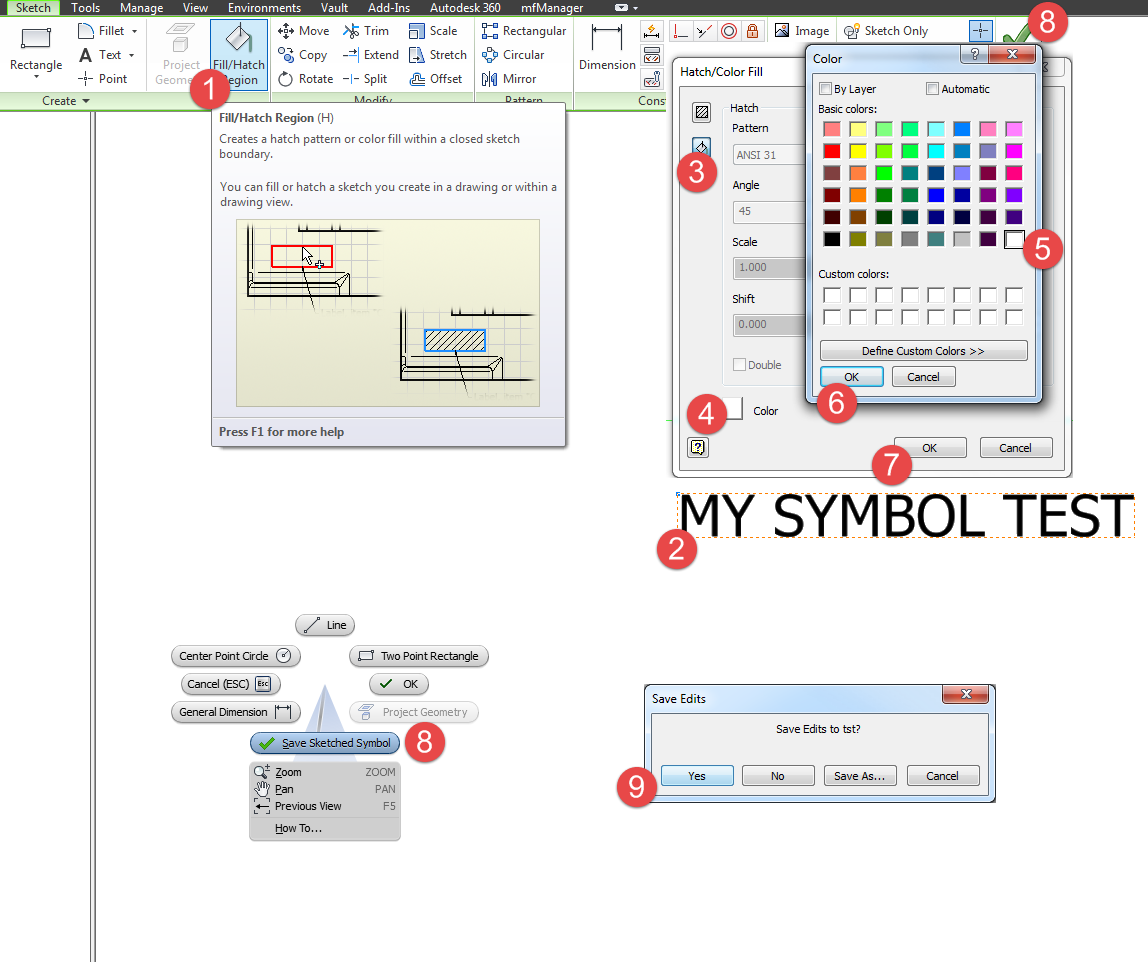
On the drawing browser right click the Sketched Symbols folder in the Drawing Resources node and choose Define New Symbol. Then create your text but make sure you turn the Text Box option on.

At this point the text dotted line cannot be used for filling/hatching but you can either draw a rectangle on top of the text border or what I like to do is use the offset command and put another border around my text. On the Sketch tab choose Fill/Hatch Region and click select your profile, and then select Color Fill option and click the Color button on the bottom. Choose your color, click OK to exit the fill/hatch dialog and then save your symbol.

This method is not perfect and there’s missing functionality here but once you used the fill command to put a mask in the symbol you can also edit the Symbol (not Edit Definition) and choose Symbol Clipping. This will remove extension lines behind the symbol like from dimensions and other leader texts.
On the left you have Symbol Clipping on and in
the right of.

Give it a try and let me know how that goes.
Unfortunately in 2016 the fill/hatch will not hide objects behind it but we are waiting for the fixes.

Later,
ADS
photo credit: Star Wars Weekends 2011-Last Day via photopin (license)
No comments:
Post a Comment