Thursday, 10 March 2016

Precise Move Components

Is there a way to select components in an assembly and move them all an exact relative distance?

Sometimes we just need to move a group of components in a certain direction all at once and if they are constrained together then it is just a matter of editing the constraint value but what if they are not constrained one to another or what if the parts are not constrained at all.

Some of foreign models we receive are translated as assemblies with parts but as you know those are not constrained but rather placed together and they are free to move around.

If the whole imported assembly needs moving that’s easy, right? Just constrain it and then edit the dimension value but what if you need to reposition some of the parts inside the assembly?

My blogs seem to be related to one another and while this is not entirely intentional I think you will remember them better, just like in school when we were told the same thing over again till we got it.

The way to move several components (parts/assemblies) at once is to demote them to a temporary assembly, move/constrain them, and then promote them again. Because constraints work with faces, axes, planes, they will follow the members (parts/assemblies) no matter how you move them in the tree structure, in other words Promote/Demote will not mess up the constraints.

For example, say you have 4 chairs constrained to the floor and you need to move them together an exact, relative distance. When you demote the chairs the assembly containing them will have 4 constraints to the floor and after you move the assembly around and you promote the chairs you will see that each is constrained to the floor.

If the components need to move along the origin axis then you are better/faster to edit the value in the iproperties / Occurrence tab / “Current Offset from Parent Assembly Origin”.

Select your components you choose to move and press TAB key or use right click Component / Demote command. Don’t worry about giving a proper name or save location, we will never save this assembly on disk. It will stay in memory just till we finish with moving.

Demote components

TIP: In browser you can use SHIFT, CTRL select but in the graphical window you can use window selection.

Click OK in the Create In-Place Component window and then right click the newly created assembly and choose iproperties.

Precise move.

Head over to Occurrences tab and change the value in the X,Y,Z direction as you need.

You can use the origin indicator to help with choosing dimension. Remember that a negative value will move it against the axis direction (check the arrow indication) while a positive value will move in the direction of the axis.

Find the assembly in the browser and promote all of it’s components back again. You will notice that they have kept the new position.

Promote components

Delete the temporary assembly and choose No in the save dialog window.

Delete temp assembly.

It might not be that often that you will use it but it’s good info to have when dealing with large imports.

Short animation.

Later,
ADS


photo credit: mic (license)

Monday, 7 March 2016

Removing phantom fittings

                Although similar with last post I need to share some tips on how to populate a corrupted route again. Last post we discussed how to delete fittings and today we are using the info there to remove fittings and segments that don’t update. 


                This is a scenario that I see a lot and it refers to broken links and updates on the fittings. You modify a route and when you try and update the run you realize that some / all fittings don’t update position and sometimes Inventor creates a complete new set of pipes and fittings ignoring the existing ones.

                I don’t have a case at hand but I will share the one on Autodesk Forum I have been answering and which can be seen here.


                As you can see from the images, Inventor decided to keep some segments in place when the route has been changed.

                A different case would be when you need to remove the populated fittings and segments from a route like in this post here.
               
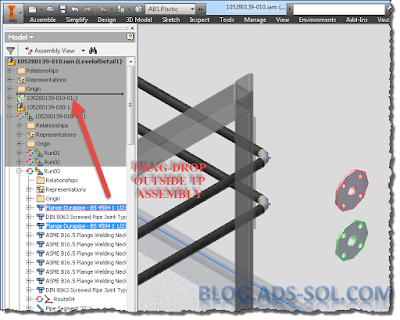
                Just like in my previous post you need to move the fittings and segments outside T&P assembly (promote) and then demote them to a new assembly which can then be deleted.

                The problem is, once you move those fittings you can’t populate the route again. We are technically hiding the elements outside TP and then we delete them so the route has no clue that the parts have been deleted.

                If you do need to populate it again then I have a trick and this is the reason we are here today.

                The route can’t be populated again but you can copy/paste it and then make it adaptive and this will replicate your exact route. Because you are doing this at the route level (instead of run level) you will get the default fittings and not any manually placed ones (valves, reducers, etc.) but nonetheless it is far better than sketching the route again.

                Inventor will NOT place the route in the original location and you will see it at a distance adjacent to the corrupted one.  As a rule any new files will be created at assembly origin and that means that any route will be located at the run origin but without constraints. You can always check the position of the original one by checking the iproperties/occurrences tab.

                You have two options to move the route to a new location:

1                1 - You have not used the Make Adaptive command yet. Once you paste the route you can then right click on it and in the iproperties / Occurrences tab you can enter 0 in the “Current Offset from Parent Assembly Origin” and then click apply. Then you can use the Make Adaptive command.

Position route at origin.
Make Adaptive menu.

                2 - If you have use the Make Adaptive and even used the Populate Route command you can repeat the steps before but in the Occurrences tab take of Adaptive first and then put 0 in the offset value fields. As soon as you click apply, the Adaptive box should be ticked automatically for you if not make sure to put it back. You can't just change the position of an adaptive route or you will get this error:
"
                "Properties: problems encountered while executing this command
                Invalid input for Request"


Take off Adaptivity first.

Limitations:

-          You still need to connect the route to your equipment around.
-          Sometimes, if the location of fittings and segments don’t update you need to edit the route and simply click on “Finish Route” to force an update. Update button or rebuild all will not help you.

Force update the fittings and segments.
Small animation of the process.

This trick is part of the “How to constrain my TP assembly and its components” blog which will come at a later time. Way too many to handle at once.

Latter,
ADS.


photo credit: fittings (license)

Tuesday, 1 March 2016

Deleting Fittings

                Deleting fittings can be daunting and you can end up spending hours in rework. If ever struggled with this then problem you will be happy to know there’s a trick or two to bypass this limitation (bug more likely).
All fittings CAN be deleted, just need to know how.

                Usually as you select a fitting you will get Delete option on the right click menu but every once in a while, just when you need it most and you are in a hurry, rushing a deadline you find this missing option. You probably hope no one will see a fitting floating around or as an advanced user you are, you turn the visibility off for the component in the design view presentations or turn the line visibility off in the drawing.

Missing Delete option on the right click menu.

                Not to be finger pointing, but I had someone turning the color of the lines white on the drawing in his need to hide/delete a fitting. This tricked the drawing aspect but not the prints and exports.

                You will more likely see this bug when you copy/paste a fitting in the browser or graphical window. I tend to do this when I need a copy of an existing fitting with a different size. For some reason the new fitting will lose part of the TP functionality (icon on the browser will not be a blue tee icon specific of TP fittings). At this point you cannot delete it unless you select it and then press delete on your keyboard. There is no delete on the right click contextual menu on the graphical window or browser

                If using “Delete” on your keyboard is also not working, the trick is to use demote, promote to a point where delete gets active and you can use it.

                Select the fittings in the browser and drag them outside T&P assembly. Then step at that level and notice that there still is a missing delete option on some/all of the fittings. Select them again and use demote on the right click contextual menu (under Components) or press “TAB” on your keyboard.  

Drag / promote fittings.

                Don’t worry about giving a proper name and a save location for the new assembly. We will never save it but instead, as soon as the fittings are grouped under this new file select it and press Delete key or use the right click contextual menu.
 
Still missing Delete? Demote them...
 
How's this working then?

                In the next post will be covering broken links for fittings that don’t update with the route and for some reason they remain in the assembly. While the fix is similar there is a catch on how to get that route to populate again and save recreating the route.

Delete key worked but here's promote/demote. 
Later,

ADS.


photo credit: Selection (license)